

Claude Desktop uses the same connectors as claude.ai. Add your WordPress site to Claude once with the free Llamly MCP plugin and it shows up in the desktop app on the same account, ready to create and edit pages and posts, change blocks, upload media and organize menus, with every change recorded and reversible.
What you need
- A Claude account and the Claude desktop app, signed in to that account. Custom connectors work on every Claude plan; on the Free plan, one at a time. On Team and Enterprise plans, the organization owner adds the connector first in Organization settings › Connectors.
- A WordPress site on a public HTTPS address. Site only on your computer? See the local bridge below.
Steps
- Install Llamly MCP from Plugins › Add New in wp-admin and activate it.
- Open Llamly › Connections and choose Claude Desktop.
- Click Add to Claude. It opens claude.ai with your site already filled in and opens new connections on your site for 30 minutes. Check the address and click Continue and Add.
- Claude opens a sign-in page on your site. Check what it asks for, choose the access level and click Approve access.
- Open the Claude app. In a chat, click +, open Connectors and check that your site is turned on.
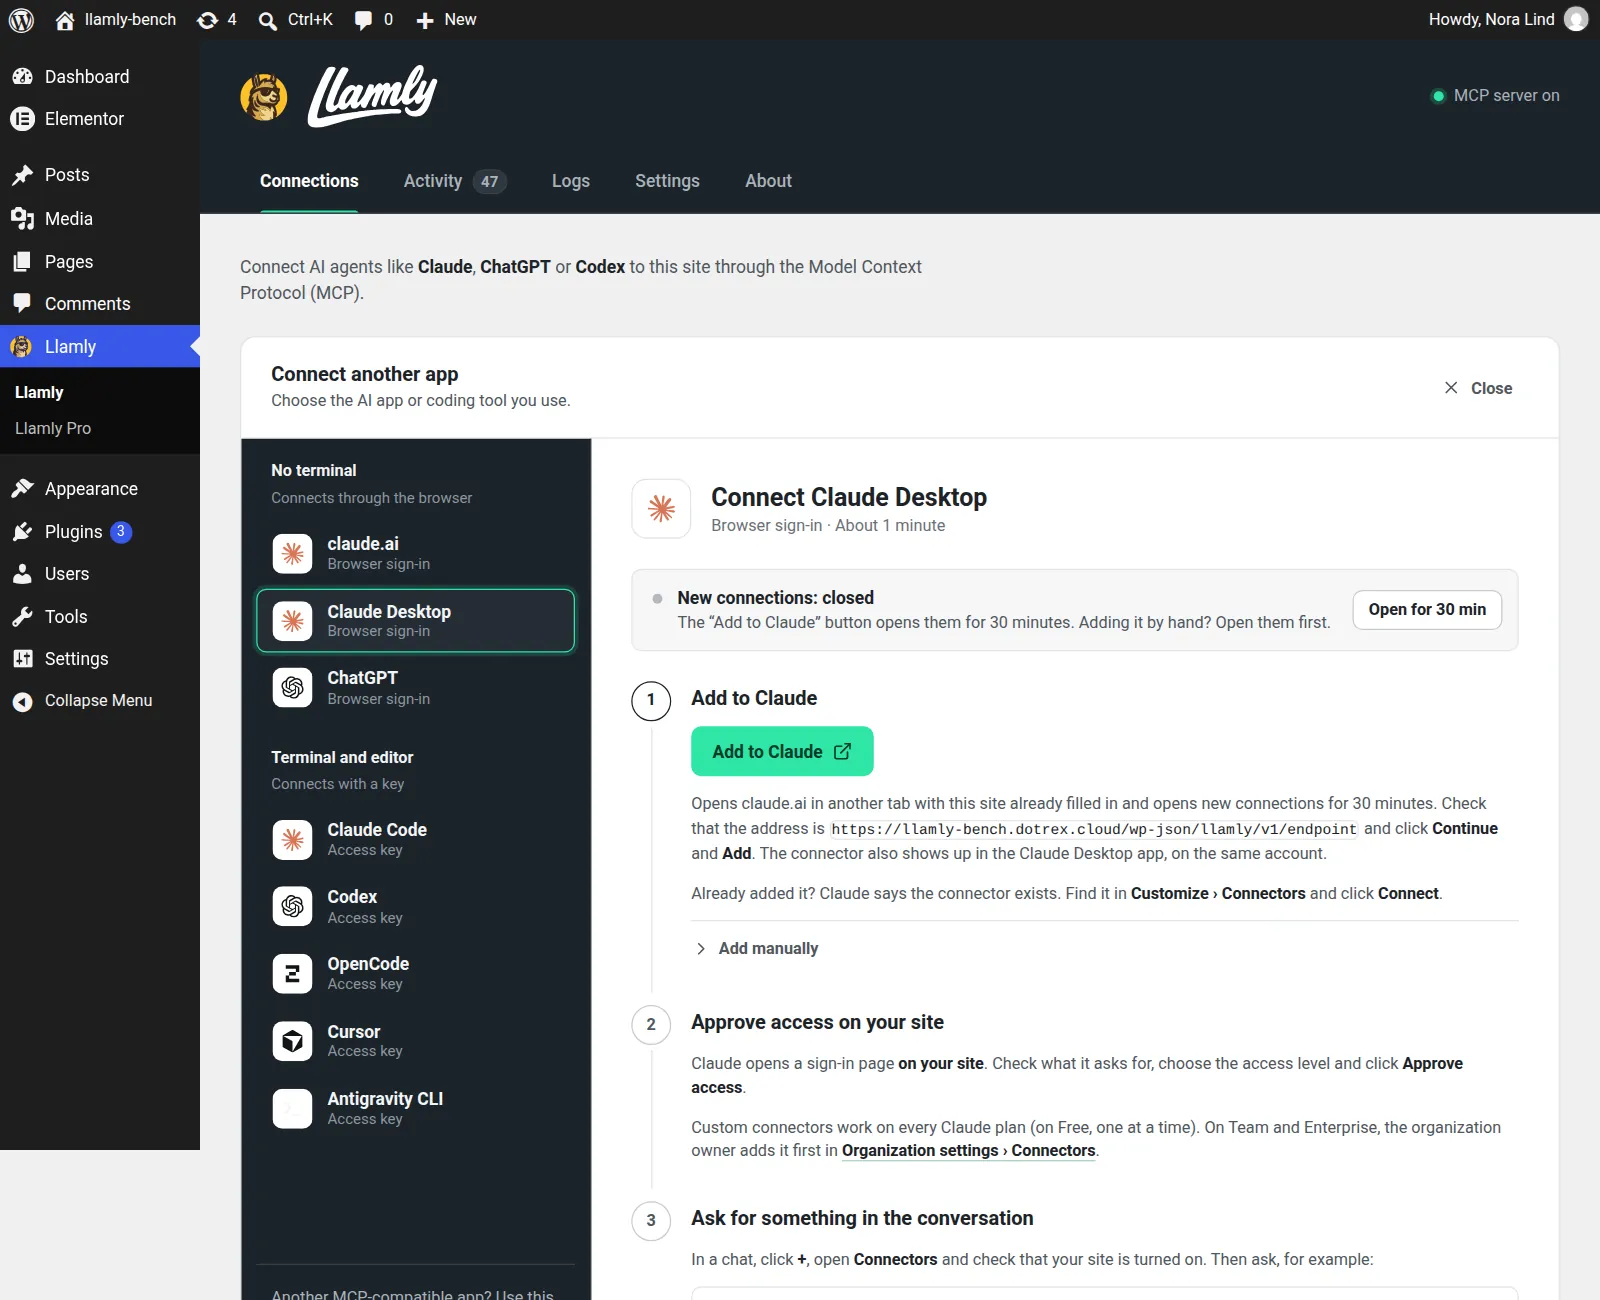
Prefer to add it by hand? In the recipe, open Add manually and copy the address. In the Claude app, go to Customize › Connectors, click + Add and Add custom connector, give it a name, paste the address and click Continue and Add. If it asks which OAuth client to use, choose Register automatically. Open new connections for 30 minutes in the recipe first.
Site on your computer? Use the local bridge
Claude’s cloud connector can’t reach a site that only runs on your computer. For a local site, the Claude Desktop recipe switches to a local bridge: a small program that runs on your computer and links Claude Desktop to the site, with nothing exposed to the internet.
- In the recipe, create an access key: give it a name and choose the access (full access, read only or chosen tools). The key is shown only once.
- Add the snippet from the recipe to
claude_desktop_config.json(create the file if it doesn’t exist). On macOS it’s in~/Library/Application Support/Claude/, on Windows in%APPDATA%\Claude\. The snippet looks like this, with your site and key filled in:
{
  "mcpServers": {
    "my-site": {
      "command": "npx",
      "args": ["-y", "mcp-remote", "https://your-site.example/wp-json/llamly/v1/endpoint",
        "--header", "Authorization:${AUTH}"],
      "env": { "AUTH": "Bearer YOUR_KEY" }
    }
  }
}- Quit Claude completely and open it again. Open a new chat and click the tools icon: your site should show up. The first time can take a while as the bridge is downloaded.
The bridge needs Node.js and uses the open-source mcp-remote package, started on demand by npx. The key is stored as plain text in that file, so prefer a read only key if you don’t need edits.
Your first request
Ask Claude:
List the drafts on my site that haven’t been published yet.
After the first request, Llamly marks Claude Desktop as connected and the request shows up in Llamly › Logs.
What Claude can and can’t do on your site
Claude works with your WordPress content permissions, never administrator ones: no site settings, users, plugins, themes or code files. Every change is listed in Llamly › Activity with an Undo button, and safe mode makes Claude confirm before it deletes something or undoes a change.
Watch the tutorial
The 2-minute video shows the Add to Claude flow step by step: watch it on YouTube.
Get Llamly MCP
Llamly MCP is free on WordPress.org. Download Llamly MCP from WordPress.org. Using another app? Compare all apps.